The Insert DIV Tag Extension v~1.02Extension Developer:Angela
C. Buraglia About the Extension
The Insert DIV Tag Extension was inspired by a post on the Dreamweaver Newsgroup made by ::kindler chase::. Important: The tutorial below shows images and makes reference to the extension for Dreamweaver 4/UltraDev 4. Notations are made for the differences found in the version for Dreamweaver 3. The version for Dreamweaver 4/UltraDev 4 disables some fields by default as a visual reminder that you must switch the radio button to "yes" for those fields to work. In the version for Dreamweaver 3, the fields are enabled, but you must remember to change the radio button to "yes" if you want those fields to work.
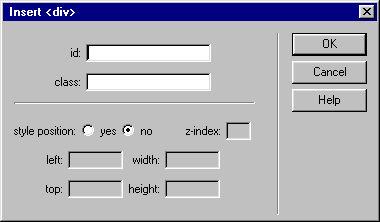
The DownloadsInsert DIV Tag v~ 1.02 Now Fixed: Version 1.02 now adds the px to the positioning and dimensions of the layer. This was a bug in version 1.01. Please download the current version below. Sorry for any inconvenience this may have caused. Get the extension for Dreamweaver 4/UltraDev 4 here. Get the extension for Dreamweaver 3 here. This extension can only be found here at this time and is not recommended for versions of Dreamweaver not listed above. Dreamweaver MX 2004 introduced a new object that is far more useful than my extension called Insert DIV Tag. In other words, this extension is not related to the object by the same name that comes with Dreamweaver MX 2004. There will be no further updates of this extension. The InterfaceBecause the primary use of this extension is to add simple <div> tag with optional id or class, the attributes for a standard layer are set to no by default (and disabled in the extension for Dreamweaver 4/UltraDev 4). If you would like to add any of those attributes, simply mark yes and the fields will be enabled.
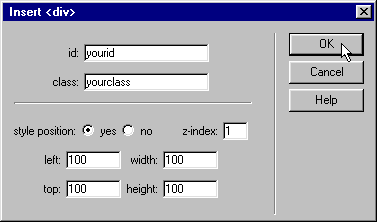
Note: If you are using Dreamweaver 3, the fields will not be disabled. Be sure that if you want to use the other attributes, that you change the style position to "yes". The Example(s)If all of the fields are entered (and the radio button is set to "yes"), the code inserted will look something like this: <div id="your_id" style="position:absolute; left:100px; top:100px; width:100px; height:100px; z-index:1" class="your_class"></div> Here is what the user interface would look like for the above code:
Inserting the <div>Tip: To bypass the user interface and only insert <div></div> into the page, Ctrl-Click (Windows) the Insert <div> icon,
To add an id attribute to the <div> type in a unique Id in the id field. To add a CSS class to the <div> type in the class name in the class field. If you'd like to add other attributes, change the style position radio button to "yes", then enter the attribute fields you desire. The Layer OptionsThe chart below displays the code which is entered into the document for each of the text fields. Remember: The radio button must be set to "yes" for the left, top, width, height, and z-index fields to produce code. Note: If the radio button is marked "yes" then the code style="position:absolute;" is automatically added to the document.
|
||||||||||||||||||||
::This page last modified 8/13/2013 at 03:37::
 |
Copyright
© 2001-2025 DreamweaverFAQ.com All Rights Reserved. All brands, trademarks, tutorials, extensions, code, and articles are the property of their respective owners. A production of Site Drive Inc. Legal Notice | Privacy Policy | Disclaimer & Notice
|
 |
 The Insert DIV Tag is an Object which allows you to insert an empty DIV Tag with options for attributes to include. This is especially useful if you use CSS quite a bit and/or are a fan of table-free design.

