Site Structure Planning and Mapping- The Procedure, Steps 7-9Author: Corey
Eiges Steps 7 - 97. Click inside the (yellow) layer named "rootfiles." Make sure your cursor is at the last line within the layer.
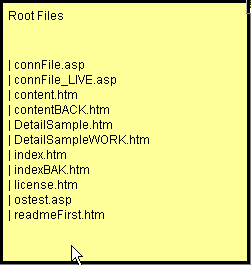
Next, highlight the list of files (not folders) that are at the root level of your site, that TreePrint produced. Copy that list (Ctrl+C) including the " | " characters and paste inside the rootfiles layer. Press the [Enter] key to add an extra line break at the end. Here is what it should look like at this point.
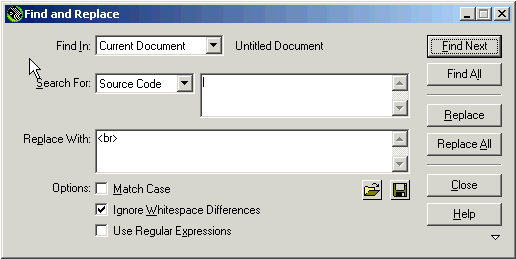
Next, press Ctrl+F to do a Find & Replace or Edit» Find and Replace. We are going to get rid of those " | " characters. For "Find In" select Current Document. "Search For" must be set to Source Code. In the box to its right, enter the | character, which should be above the backslash on your keyboard. In the "Replace With" box enter <br>. Here is what it should look like:
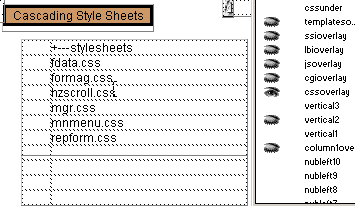
Now click the "Replace All" button. This will open the Code Inspector. Close it and the Find & Replace box as well. When you click on the page you will see that all of the | characters have been replaced with line breaks so that each filename appears on every other line. Tinkering Warning: Should you decide to alter the page by adding javascript, most especially the NN4 Resize Fix, bear in mind that you will probably overwrite all "|" characters in the javascript with <br>, so browsers will report errors with the page. 8. Click the shut-eye next to the column1overlay layer name in the Layers panel so it becomes an open-eye. You will now see the table overlaying the file list. Leave it that way for now. We will assign labels to the CSS files, etc. before proceeding further. Setting Up The Assets9. Within the cssunder layer you will see a 2-column table. Copy the list of files in your site's css folder (including the folder name itself) from the TreePrint output and paste it inside the righthand column of that table. Here is what it should look like:
Next, press Ctrl+F to eliminate the | characters. This time, instead of entering <br> in the Replace With box, make sure there is nothing at all in that box. Note: In this case we do NOT want a blank row between filenames. The reason for this change is that each file will only have one label and that will be to the left of the filename. These are your site's "assets." By contrast, the html pages of your site will have several labels, some css, some templates, etc. showing which assets are referenced by or associated with each page. Therefore for the pages, we place up to nine different labels in a blank row below the filename, but for these asset files, we only need one label and that appears to its left. After you click the Replace All button, the layer and table should look like this:
If you wish, you may replace the +--- in front of the folder name with a backslash. Now, click the shut-eye next to the cssoverlay layer and the overlay will become visible. Make sure that you leave cssoverlay highlighted in the Layers Panel.
|
|
« Previous | 1 | 2 | 3 | 4 | Next » |
::This page last modified 8/13/2013 at 03:37::
 |
Copyright
© 2001-2026 DreamweaverFAQ.com All Rights Reserved. All brands, trademarks, tutorials, extensions, code, and articles are the property of their respective owners. A production of Site Drive Inc. Legal Notice | Privacy Policy | Disclaimer & Notice
|
 |


