ASP Data Collection FormsAuthor: JoJo Tutorial RequirementsImportant: To complete this tutorial you will need to have Dreamweaver 4, UltraDev 1, UltraDev 4 or better. Unfortunately, Dreamweaver 3 will not allow us to code above the opening <html> tag. This is a necessity for the use of VBScript, as you will find out as we progress through the tutorial. Important: To successfully complete this tutorial the server you are hosting your site on must have the ASPMail COM installed and working. You can get this information from your host or by downloading James Harris' excellent "Mailer Program Test & ASP Component Tests" from the following link: http://www.pensaworks.com/prg_com.asp . Full instructions are included within the zip file. To set James' test pages up it is as easy as unzipping the download and uploading the page to your site. Simply browse to the uploaded page via your browser to view the comprehensive results of installed and not installed COMs. If the ASPMail COM is installed, use the Mailer Program Test to verify that the COM is working. Often these COMs are there but that doesn't mean they are installed correctly or have been set up. The ObjectivesThis tutorial assumes you know nothing about ASP data collection forms, which is probably why you are reading this now! The aim of this tutorial is to familiarize you with the ASP data collection form. We will create two pages; the form page for the viewer to add the data for submission, and the response page that will gather the data and send it on to its pre-designated destination. Further to this we will look at how we can arrange the collected data into a legible format by breaking down the information into sections so our clients can receive a structured response to the requested information. The process will involve some simple hand coding (VBScript), but nothing that you can't cope with! Getting Started
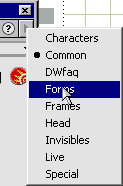
Considering the Form StructureWith our form.asp page open in design view we can now begin to build the form. This example will include two distinct sections so we can look at breaking the returned data into two areas for easy recognition by the client. Continually running data line after line can look cumbersome and be hard to decipher. In the first section we will gather all the generic data such as first and last names, company name, contact details etc. In the second section we will have a look at how we want to collect the data from the viewer, and look at a couple of different methods of collecting the data.Inserting the FormTo get access to the forms panel we need to open the Objects Panel, Window» Objects, then click the small downturned arrow head on the "common" bar of the objects panel. This will produce the drop menu containing our forms panel, click the forms option to open the form panel. With the Forms Panel now open we can select the Insert Form Object as shown in the image on the right. Click the insert form object and we now have a form on our form.asp page
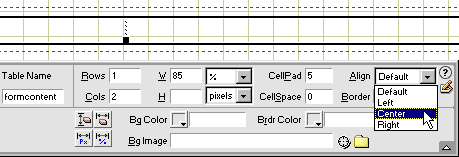
Structuring the FormWith our form on the page we can now begin to design the forms content Ensuring that your cursor is inside the form, insert a one row two column table. I prefer to set cellpadding to 5 to give the form elements some "air", the width of the table will be governed by your design; for the purpose of this tutorial I'll use a width of 85% with the cellspacing and Border attributes set to zero . The image above clearly shows the table inside the red dotted outline which is how the form is shown in design view. I've given the table a name (formcontent) to make it easy to find, should we need to delve into the source code to check anything. The tables alignment has been set to "Center" in the Align drop list. Adding the Form ElementsWe will begin by adding the text fields title, click inside the left hand cell and type First Name: then click inside the right hand cell and from the Forms Panel click the text field object as shown below
After inserting your text field your formcontent table should look like the image below.
On the next page we will look at the Property Inspector (The PI). |
||||
|
||||
::This page last modified 8/13/2013 at 03:37::
 |
Copyright
© 2001-2026 DreamweaverFAQ.com All Rights Reserved. All brands, trademarks, tutorials, extensions, code, and articles are the property of their respective owners. A production of Site Drive Inc. Legal Notice | Privacy Policy | Disclaimer & Notice
|
 |


