|
 The
format drop down allows you to change the block-level tags that
surround the selected text. So you can change a regular paragraph
(<p>) to a heading (<h1>). The
format drop down allows you to change the block-level tags that
surround the selected text. So you can change a regular paragraph
(<p>) to a heading (<h1>).
|
|
 Use
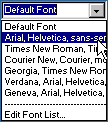
this drop down to set the font (uses <font> tags) for the
selected region (I recommend you avoid this and use CSS). Use
this drop down to set the font (uses <font> tags) for the
selected region (I recommend you avoid this and use CSS).
|
|
 This
sets the font size (uses <font> tags) for the selected region
(I recommend you avoid this and use CSS). This
sets the font size (uses <font> tags) for the selected region
(I recommend you avoid this and use CSS).
|
|
  This
sets the font color (uses <font> tags) for the selected
region (I recommend you avoid this and use CSS). This
sets the font color (uses <font> tags) for the selected
region (I recommend you avoid this and use CSS).
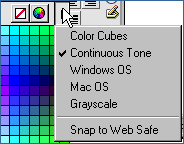
Inside the color picker, you can choose the color Panel,
using the drop down on the far right hand side of the color
blocks.
|
|
 The question mark opens the Macromedia Help File for the current
property inspector you're using. If you're using the Font inspector,
text formatting help will come up. If you're using the layer inspector,
instructions on how to set layer heights, widths and positions
will be displayed.
|
|
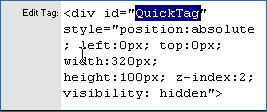
 Ahh... the Quick Tag Editor. When you just can't get the property
inspector to do what you want it to, you can click the quick tag
editor to directly edit the current selected tag. You'll get a
box like this:

Just edit the tag however you like, and hit enter.
|
|
 Some of you may be asking "What's this? Why doesn't my PI
(short for property inspector) have this?"
The attribute editor (the bottom tab) is a feature in UD4,
which allows easy access to all the attributes for a particular
object on your page. The top button/tab allows for quick
easy toggling between views. It is especially useful if
you have long links that cannot be seen in the link field
of the regular view.

|
|
 The link editor is what you use to create your hyperlinks. You
can type links directly into it, or click the drop down box to
choose recently used hyperlinks (useful to create that link to
"Home" from every page).
If you don't feel like typing them in manually, you can
use the next two buttons to the right.
|
|
 The target function is one of the least used (but coolest) functions
in Dreamweaver. You can simply drag the target icon to a file
in your site window, or even a named anchor on your page, and
Dreamweaver will write the link for you.

|
|
 You can use the always recognizable browse folder to browse your
hard drive for a link. Just browse like you would in explorer,
choose the file you want, and click OK, and Dreamweaver will write
the link for you.
|
|
 The
Target drop down allows you to choose which window a link will
open in. If you have a frameset your frame names will also show
in this box (but only if you're actually editing in the frameset). The
Target drop down allows you to choose which window a link will
open in. If you have a frameset your frame names will also show
in this box (but only if you're actually editing in the frameset).
|

|
Clicking the down arrow will give you additional options,
if they exist for the current group of tags you're in. In
this case, you're seeing the properties for the table that
this page is contained in.
|
Magnum P.I. (Property Inspectors, not Private Investigators)
Author: Daniel
W. Short
Author's Site: Web-Shorts.com
Reference ID: 15615
The Default Property Inspector
The PI (no, not private investigator, Property Inspector), the
life blood of DW. What does it do? What are all those buttons? What's
that tiny icon on the right mean? That's what I'm here to tell you.
We're going to be going over the most common PIs in DW4 and UD4.
Move your mouse over each item in the inspector to see what it
does.

Here's our default PI. The PI is used to change just about every
attribute of any object on your page. The default PI is the one
you see when you don't have any thing selected but text. There are
some obvious, and not-so-obvious buttons on here, that we'll be
taking a look at.
When you're done with this one, you can take a look at some of
the other PIs in Dreamweaver. I won't make you go through one by
one, just choose the one you want to check out.
|


 The
format drop down allows you to change the block-level tags that
surround the selected text. So you can change a regular paragraph
(<p>) to a heading (<h1>).
 Use
this drop down to set the font (uses <font> tags) for the
selected region (I recommend you avoid this and use CSS).
 This
sets the font size (uses <font> tags) for the selected region
(I recommend you avoid this and use CSS).
 This
sets the font color (uses <font> tags) for the selected
region (I recommend you avoid this and use CSS).

 The link editor is what you use to create your hyperlinks. You
can type links directly into it, or click the drop down box to
choose recently used hyperlinks (useful to create that link to
"Home" from every page).
 The
Target drop down allows you to choose which window a link will
open in. If you have a frameset your frame names will also show
in this box (but only if you're actually editing in the frameset).
